

By Pat Donahue
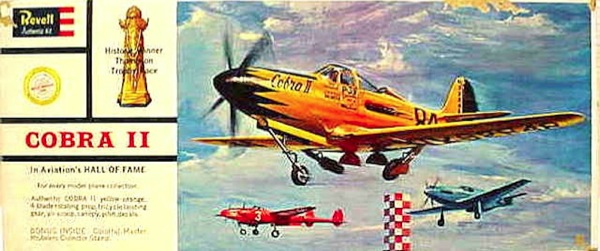
Do you remember the 1950s Revell box art of the P-39 air racers? If you wanted to build one of the famous Thompson Trophy racers, Cobra I or Cobra II, this was your only out of the box choice for many years. Then Accurate Miniatures came to the “rescue” and released a kit of the racers using the Eduard P-39 plastic as a base. Much has been written about the plastic in Accurate Miniatures latest releases of the SB2C-3 and the P-39 racers as not being what the box represents. Unfortunately this is true. The SB2Cs require cutting and scratch building and, IIRC, the photoetch dive flaps are incorrect for this variant. As far as the P-39s racers go, all the reviews are correct: you CANNOT build an accurate Cobra racer from the A/M kit. Fortunately, Hasegawa released a "Limited Edition" Cobra racer kit that went a long way toward doing a complete racer, however it still leaves out a few odds and ends. If you do a little research and are willing to do the work, you CAN get an Accurate (no pun on words here) Cobra racer.
I will divide this article into two parts. Part I describes the two versions of the aircraft (Cobra I & Cobra II), their differences, and the kits, aftermarket parts available to do the conversion. Part II focuses on the building of my model of the Cobra II.
As the two racers were “twins”, it is ASSUMED that the small details apply to both a/c. Most of the photos of the Cobras that exist are of the winning Cobra II and the detail items listed below were gleaned from photos of this a/c. There is plenty of research available to do these machines. Large clear photos are easy to find and valuable when checking out all the small additions and deletions such as vents, breather tubes and stiffeners. Birch Matthews’ book on the P-39/63 series, Cobra!, is excellent and contains many nice photos of the two racers. Airacobra Advantage: The Flying Cannon by Rick Mitchell is also a good source of info with pictures and an interview with the former crew chief of Cobra II. Tex Johnston’s autobiography Jet Age Test Pilot has a whole chapter devoted to the a/c and the race. In addition to these books, there is quite a bit of web based information from the references to the Cobra racers available in the IPMS SIG on air racers, this high quality color movie on you tube, and a good article on Internet Modeler (from which the drawings in this article are taken).
Cobra I 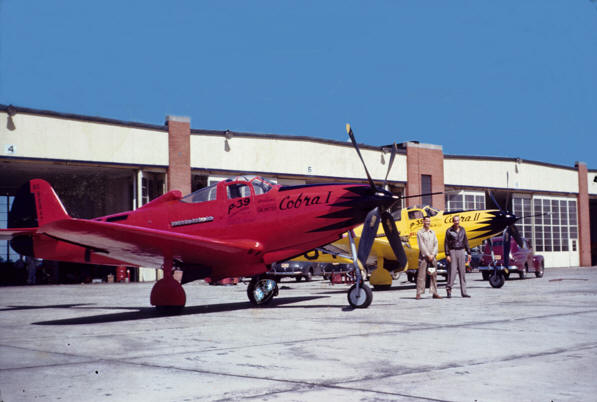
This was a P-39Q aircraft with the following modifications:
- 1. All military equipment removed.
- 2. All armor plating, including the plate that sits at the bottom portion of the windshield, and its associated fairing at the aft end of the top cowl removed.
- 3.Armored glass removed.
- 4. Bullet proof fuel tanks removed. Additional fuel bladders were installed in the outer armament bays and a fuel tank was installed in the fuselage.
- 5.Gun sight was removed.
- 6. A souped up Allison engine was installed which was capable of pulling 86 (!) inches of manifold pressure and near 2000 horsepower.
- 7. A pointed spinner with the pitot sticking out 4 feet +or- a few inches (my guesstimate from photo measurements) in front of the a/c through the spinner was installed.
- 8. A wide paddle blade 4 blade prop was installed (not the 4 blader given in the Eduard - A/M kit). The nose shock strut was pumped up so the big prop had adequate ground clearance.
- 9. The gun ports on the cowl were plated over. No vents on the armament doors. A vent was installed on the left rear hatch behind and below the triangular engine access panel. A filler point was installed on the left rear door post above the small scoop just behind the door. No gear box drain in front of the small nose gear door. To help cool the oil a ventral radiator fairing enclosing a P-40 oil cooler was installed under the center section.
- 10. 12 stack exhausts were used.
- 11. A water/methanol tank from a P-63 with a pump was installed in the left wing with an additional 75 gallon water tank in the nose.
- 12. An enlarged air intake mouth was installed on the air scoop behind the canopy, possibly off of a P-63. See drawing 1.
- 13. The internal starter was removed and an inertial starter dog for an inertia crank was installed I believe on the right rear triangular engine panel protruding slightly. Something is visible in the photos, I think this is the manual starter dog. On the same engine panel there is a small square access panel installed below the rearmost exhaust stack.
- 14. An extended fixed rudder trim tab was installed above the inset rudder tab. There also appears to be a TINY extension of another fixed rudder tab below the inset tab, see available photos. To combat flutter all control surfaces were metalized and the elevator and aileron trim tabs were fixed in position and made non movable from the cockpit (ground adjustable only). I don’t know if the balance tabs next to the aileron trim tabs also were made non movable, for you folks who like to displace control surfaces. I also don’t know if the trim tab controls, except for the rudder trim were removed from the cockpit but I assume they were as weight saving was at the top on the agenda.
- 15. The window winding mechanism was removed from the doors. The fuel selector valves were removed; fuel flow being controlled with additional boost pumps, two of which were installed in the wheel wells.
- 16. All navigation lights were removed and the landing light was also removed and faired over. There was no external antenna on the airframe as far as I can determine.
- 17. Weight and balance documents from the a/c (available in the book Cobra) state that 20 pounds of radio gear was left in the a/c along with minimal flight instrumentation. What radios were left is unknown to me; was a communication radio or a navigation radio left in? There is no radio equipment visible under the rear canopy glass in photos, nor what I take to be a gear warning horn in the Hasegawa instructions. I have also heard that the flap gap between the wing and flaps were taped over but have yet to find any solid reference to this in the 3 references listed above. I might add that Tony LeVier who finished 2nd in the Thompson in a P-38 did use Scotch Tape to cover all panel lines and gaps to reduce drag.
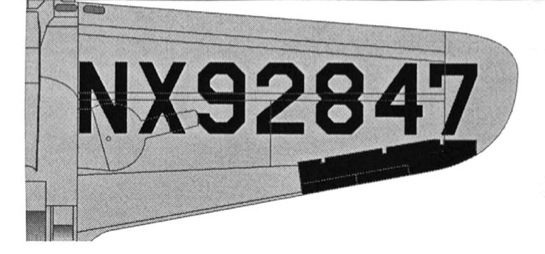
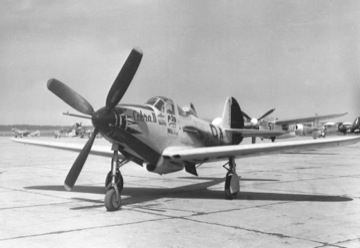
Cobra I was painted red (shade unknown to me, maybe Stearman Red?)with black trim on the nose scallops and all control surfaces. I assume that the antiglare portion was flat black. The registration numbers on the lower wing cut across the gear doors (see drawing 2).
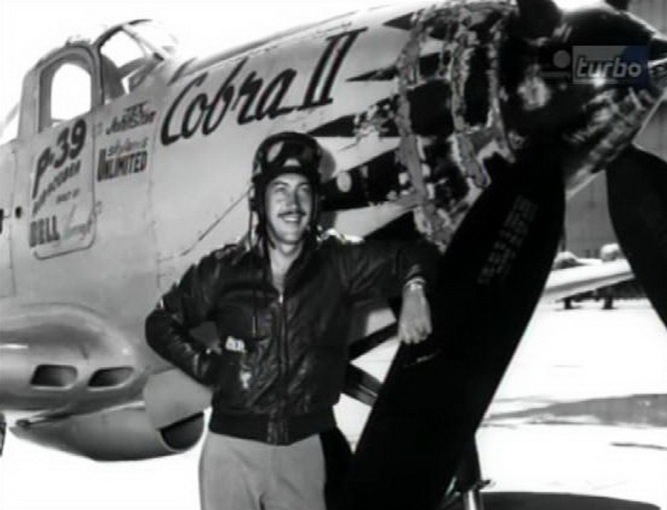
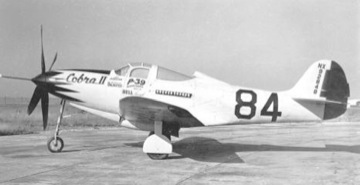
Shortly before the race Bell test pilot Jack Woolams was doing a low altitude high speed run over Lake Ontario after an engine change and the a/c went into the lake and Woolams was killed. Post crash investigation indicated that the souped up engine twisted the fuselage from its increased torque and the twisting may have lead to the windshield imploding killing Woolams. Bell president Larry Bell grieving over Woolams death tried to talk the other pilot Tex Johnston from competing but Johnston would not withdraw.
Cobra II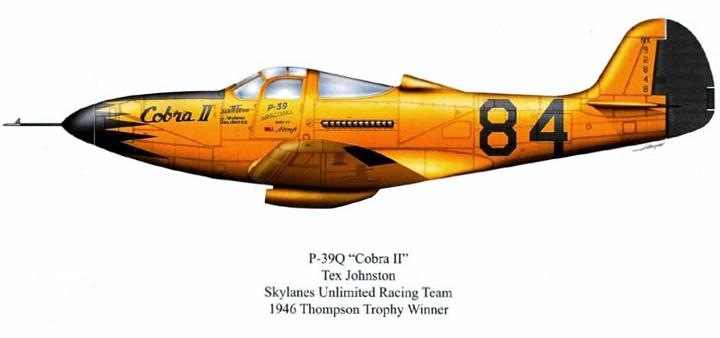
The modifications applied to Cobra I also apply to Cobra II. The Bell factory sent some additional parts to Cleveland to be installed on Cobra II before the race. These consisted of 4 rectangular metal stiffeners, 1/4 inch thick and 3 inches wide, which were installed over the top and bottom longerons on both sides of the fuselage. The top ones ran from the rear engine compartment covers to the horizontal stabilizer fairing joint; the bottom ones ran from the wing fairing back almost to the stern post. The bottom stiffeners ran under the wing fillets but this is invisible for our modeling purposes (see drawing 1).
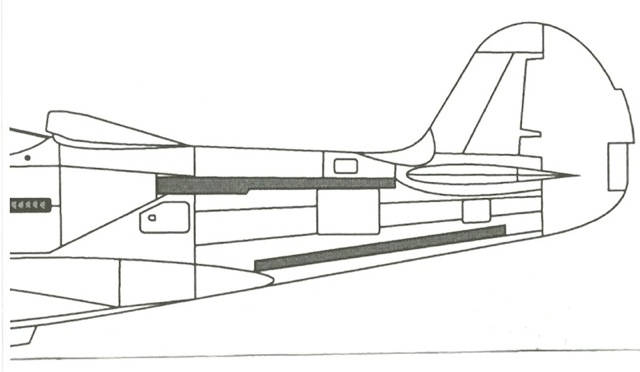
Drawing 1
Also note that the lower stiffeners were centered on the panel line. As an additional safety measure, the windshield had a reinforcing cable installed from the lower point on the doorpost/windshield frame over the windshield to the other door post.
Cobra II are said to have been painted in Chrome Yellow. Note that the under wing registration numbers on Cobra II ran in front of the gear doors (drawings 2 & 3).
Drawing 2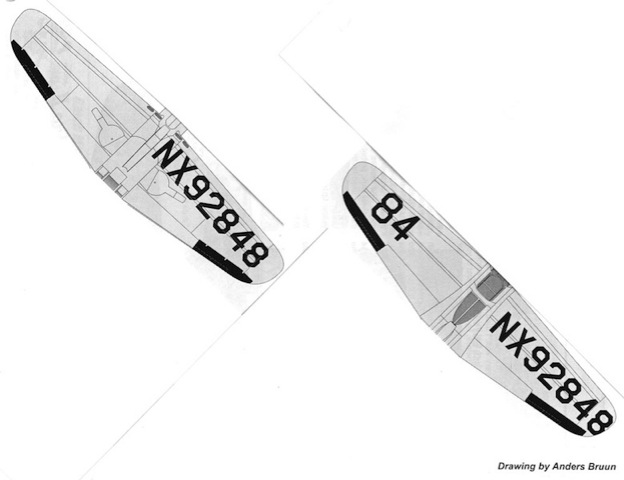
Drawing 3
Johnston went on to win the race going away. The Cobra could true out at 420 MPH at sea level. It was unbeatable that day.
While the above information is a great start, I advise you to view the many photos or drawings of the aircraft and blow them up to see clearly the many little detail modifications that were incorporated.
Kits & Modifications
You can use the limited edition Hasegawa kit, the Accurate Miniatures/Eduard kit or even the oldie but goodie Monogram kit as the basis of your conversion. If using the Eduard based releases, make sure you remember to thin the trailing edges. Hasegawa’s strange “external” framing on the fabric surfaces may be a blessing in disguise as the control surfaces were metal covered and still showed a very slight trace of the framing underneath at certain light angles. In addition, the Hasegawa kit does provide most of the visible modifications: the ventral radiator, 4 blade propeller, resin spinner and extended pitot tube. Exceptions are the extended trim tab, the enlarged carb scoop and stiffeners on Cobra II. The stiffeners and trim tab can be done from .005 sheet stock. The enlarged carburetor scoop can also be scratched up with a little work. You will a need to add the wire brace over the windshield on any of the kits if you choose to model Cobra II.
As far as aftermarket parts to aid with the conversion, XS Models in Germany did a whole slew of racing a/c modifications including parts for Cobra I and II. The resin parts include: the enlarged intake scoop, prop blades (these MAY be a bit short judging from eyeball measurements), spinner, new radiator scoop. The stiffeners are done in photoetch along with the extended trim tab. XS-Models sells on E-bay, the conversion kits for the Cobras run between $12- $14 depending on the version you want to build. Be forewarned, some of the castings are NOT Cooper Details quality.
If you can find an A/M kit at a fire sale you might want to pick it up as the decals are quite nice for the racers. There are some very minor variances from the prototype markings. A now defunct company called Race Plane Decals did decals for the racers. You might find the decals at a swap meet or on E-bay, but I must admit that the A/M decals do look better, and the new Hasegawa decals looked real good at first glance. The Hasegawa decals proved to be thin, opaque and went on very nicely, excellent decals. The scallop markings on the aircraft are not present in any of the decals except in the new Hasegawa limited edition kit (however I do think there are some ALPS printed decals now available, a search of the net may prove useful in this area).
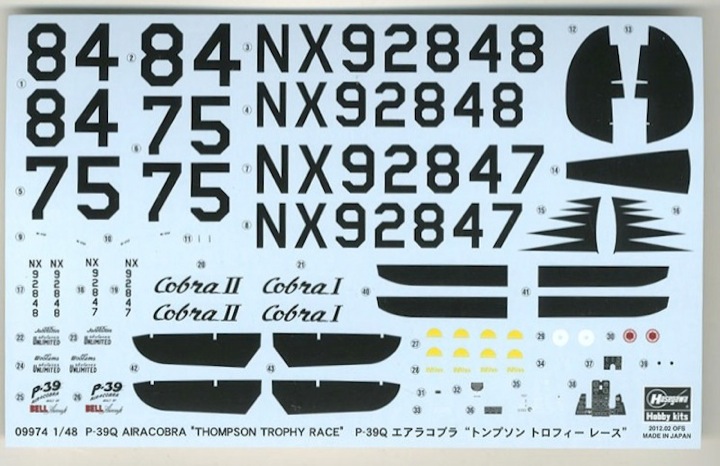
Hasegawa kit decals
So there we are. If the 1950s’ kid in you is still excited by the great Revell box art of the amazing air racers, you can now make your dreams come true and accurately model them. If anyone out there has any additional information I would appreciate it being made available.
Part II will be available soon in the “Full Build Reviews” section