Rich Van Zandt, IPMS #41265
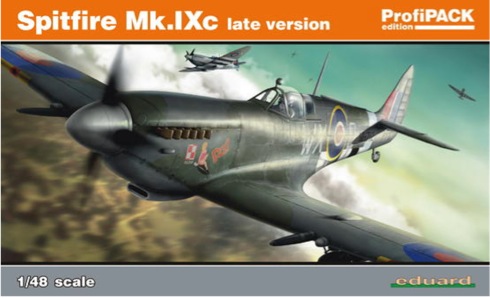
Eduard has started to release variants of the Merlin engined Spitfires, they have started with some of the later variants which have never been done properly in any scale. Their first release was the late model Spitfire IXc in 2013. This was followed by the early IXc and then the IXe. The remarks I make for the late model will also apply to the other releases as well. They have also released the late & early Mk IXc in their weekend edition kits and have just released the Mk IXe in a weekend edition. They have also released these in their Royal Class edition and now a special D-Day edition in commemoration of the 70th anniversary of D-Day with markings for 5 different Spit Mk IXc in invasion stripes.
The Spitfire Mk IX was supposed to be a stop gap measure between the Mk V which was badly outclassed by the introduction of the FW190 and the introduction of the Griffon engined later Mk Spitfires, but teething trouble with the Griffon engine forced Supermarine to use the latest variant of the Merlin engine and put it in the Mk Vc airframe with a redesigned front end that would house the new Merlin 61 to 70 series engine. Production of this Mk commented in Feb of 1942. The Mk IX eventually became the second most produced variant of the Spitfire and would be used later in many air forces, most notable the infant Israeli Air Force.
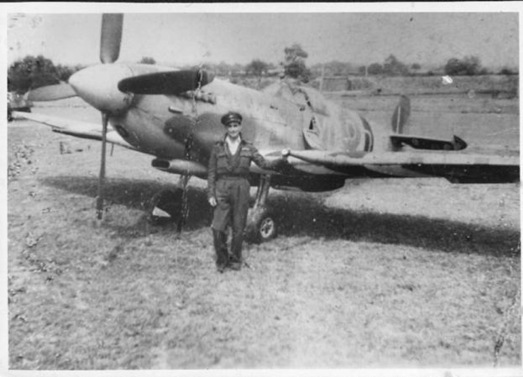
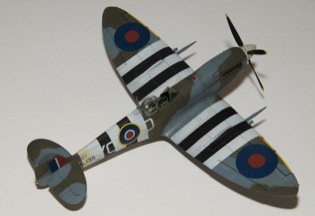
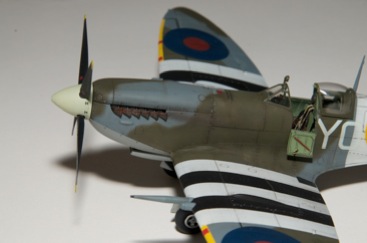
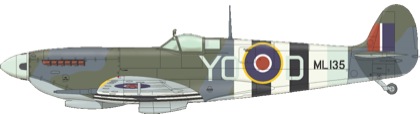
This model represents a Spitfire flown by Jerry Billing of Essex Ontario, a Canadian pilot, flying aircraft, serial number ML135, YO-D of 401 Squadron Royal Canadian Air Force, 126 Wing of the Second Tactical Air Force. He had returned from Canada after having served the RAF defending Malta then being sent home for a rest and to serve as an instructor which he did not care for. He was then sent to England and was told to go to the RCAF manning station but he went AWOL and travelled to Biggin Hill. He asked Lorne Cameron the C.O. at 401 Sq RCAF if he could use a good pilot and was accepted. He flew many sorties in different Spitfires. By D-Day he had been more or less un-officially assigned a Spitfire of his own, ML135. He remembers how they slopped invasion stripes on her. There was no time for careful masking or measuring. It was distemper paint and could be washed off. D-Day had poor weather and when they flew through rain the stripes were all but washed off when they got home. Jerry flew YO-D ML135 on D-Day and the Luftwaffe was nowhere to be found. The next day they were making a sweep over the beachhead and Jerry nailed a Ju88. When the wing went to the continent Jerry was still flying ML135, YO-D based at B4 at Beny-sur Mer. By now she was called “D-for Dorothy” and had the name emblazoned on her just below the windscreen. July 1st 1944 Jerry & 2 others from 401 Sq. were on to patrol at low level over France when Jerry's plane was hit by flak and the Merlin smoked and seized up. He belly landed ML135 into a French garden in no man’s land. He got out and ran to a stream where he hid all day in water up to his neck. His escape was aided by a French family who hid him until he was repatriated by the advancing army a few months later.
The kit consists of 200 parts on 5 sprues molded in a medium grey plastic quite different from some of their earlier kits. There is also a clear sprue with 13 parts that gives you both open & closed canopies, + a separate windscreen as well as the nicest gunsight I've seen in this scale. Also included is a fret of color photo-etch for the cockpit and precut masks for the canopy. The parts are finely molded with exquisite surface detail. Considerable attention has been paid to how the parts are broken down, and where injector pins were placed, and the location of seams and join lines. Options are available in the box to do late Mk IXc (late c-wing with the narrow gun bulge), plus the clipped wing LF variant . Two different engine cowlings are also provided. You also get 2 different horizontal stabilizers and their corresponding elevators, and a broad and narrow cord rudder. There is a nice set of decal provided that allow you to build 6 different markings including a bare metal & full D-Day striped version. In the other 2 boxings they give you the early c wing with a more prominent gun bulge and the e wing with a relocated narrow profile gun bulge. So you have a total of 6 possible different wings that are available with the 3 boxings. Eduard also makes a resin replacement cockpit for this kit with upgraded detail, however it is almost the price of the kit itself. They also make several other PE & resin upgrade parts for this kit which if you used them all would put your cost well over $100 for a small 48th scale kit.

The kit cockpit is made up of 48 parts of which 14 are photo etch, that's a lot of detail in a real tiny space. You have the option of using a decal or the supplied PE instrument panel. A few small drops of 5 min epoxie in the instrument bezels makes for a nice presentation of the instrument panel. They provide separate lower sidewalls that the bulkheads and floor support assembly attach to. Most of the other parts attach to these. The whole cockpit is painted in British cockpit grey/green with black and silver highlights. The seat is a red-brown cast phenolic seat. There is a very nice set of PE sutton harness. There is the option to have the boarding door open or closed, the same goes for the canopy. If you are going to close the canopy, some minor surgery will be required before you, glue the two fuselage halves together.

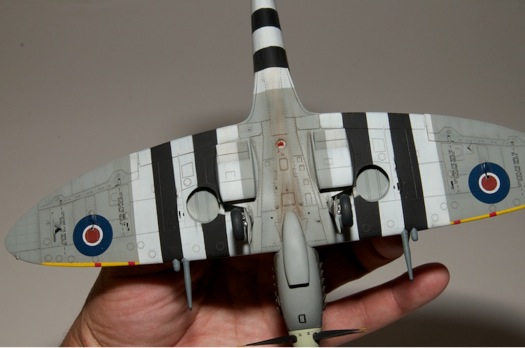
The aft cockpit bulkhead is a very delicate affair and I broke mine during assembly, but once installed you can't tell with the aft canopy in place. Eduard has provide some fuselage spacers and prop holder for the in front of the the cockpit and a nice tail wheel holder that must be installed before you close up the fuselage halves. Then whole cockpit assembly can be slide into place. There are two different fillets for the forward part of the wing, one has an additional bulge in it and the other does not, these should be attached before attaching the wings. The landing gear wells are a complicated affair with no less than 5 pieces to make up each well, this includes the landing gear attachment slot ( this could be an area of concern since you will not know if the angle of the slot is right until the gear leg is attached) Note: (The forward rake of the landing gear leg was increased on this Mk of Spitfire). The lower wing should be attached to the fuselage before you attach the upper wing. There are attachment points on the lower side of the fuselage that the lower wing will attach to this will eliminate any step at the wing fillet. Care must still be exercised with the underside attachment of the wing fuselage interface , but Eduard was kind enough to put the join line right on a panel line, which will facilitate the cleanup of the panel line. They did a very nice job in capturing the subtle gull wing underside of the Spitfire wing that no other manufacturer has so far captured in 1/48 scale. The rounded wingtips slip into the slots in the outer wings and do not require any cleanup ( the short wingtips are provided in both clear and grey plastic). The ailerons are separate pieces, they fit beautifully and show the deep undercut that is just not available on kits wings that have them as an integral part of the mould. The underwing radiators are a 7 part subassembly that fit so tightly you will need to remove any paint on the mating surface, they can be pressed into place an a small amount of thin glue will finish the attachment.
Care must be exercised when attaching the two halves of the upper and lower cowl, (the lower cowl on the late version has the extended carburetor intake) as they do not have a positive alignment tabs and must be sanded to remove a nasty seam line no matter how careful you are in assembling the parts. Once the seam is removed a fine needle and drill bit will be required to restore the lost detail. There are 2 small PE pieces to fit into the front end of the carb intake, they can be fit after the parts are cleaned up. These assemblies fit beautifully to the fuselage once completed. I would not permanently attach the upper cowl at this point because it will interfere with the attachment of the exhausts stacks later on.
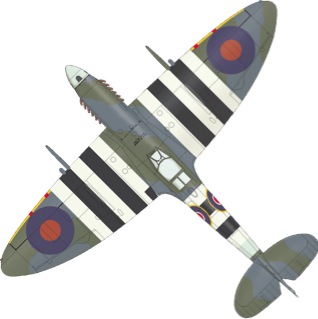
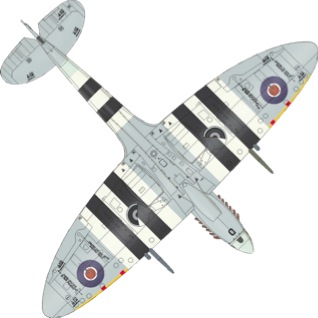
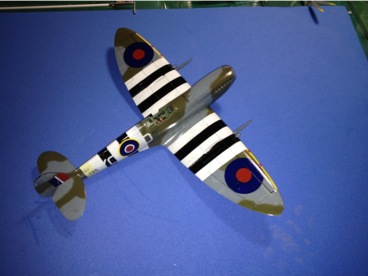
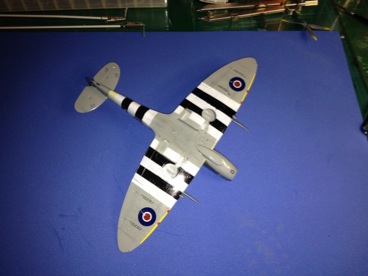
Painting this Mk is relatively easy, all but one of the schemes is in the Ocean grey underside with the A pattern top of Dark Sea Grey and Dark British Green. Tamiya has makes all of these colors and I used them for this model. Several have partial and one has full D-Day stripes, yellow leading edge ID markings and a Sky fuselage band and propeller spinner. The Black & white stripes were Mr. Color as well as the Yellow ID markings and the Sky band & spinner. After examining the drawings in the instructions I found that the stripes for the markings that I was doing were only could only be 16" wide for both the wing and fuselage bands. Some seem to have use the full 18" with but this would go out beyond the wing roundels and completely cover the Sky band on the fuselage. As always use your references to determine how your particular aircraft was painted. Once painted and sealed with a coat of future the decals were applied, the settled down nicely with only a little help from some setting solution. The decals are fairly opaque, having only a slight translucency were they bisect the D-Day invasion stripes. I fixed this for the British roundels but they could have included a white blocking decal for the code letters. Overall it's not that noticeable, however the sky color looks a little washed out. There are numerous service markings to be applied, I don't know if they would have all been applied or even visible on the aircraft so I chose to leave many of the smaller underside service markings off. These would be hidden under the oil staining that would be applied to the underside anyway.
Once I gave the decals a good going over to make sure they were all settled down into the panel lines along with a little coaxing with a fingernail or a piece of a toothpick. The model was then sealed with a few thin coats of future mixed with Mr. Color thinner and allowed to harden overnight. I decided to try something new with the weathering on this kit. I have been reading a lot about MIG washes and AK Interactive washes and thought that I would give these a go. After some experimenting with the MIG dark wash I can say that I am pleased with the result. They are applied with a fine brush and capillary action draws it along the panel lines. It can be wiped off with ordourless turpentine and a clean rag. It did take somewhat longer to do the weathering more controlled then my usual method. These enamel based washes show promise and once I get a few more shades as well as their filters, it will give me a new tool in the weathering arsenal. I finished the weathering with some light over-sprays of lighter and darker colors then sealed the whole thing with a few coats of Dullcoate to knock down the gloss finish. A bit of silver pencil was used simulate the wing root chipping and wear and tear around the engine access panels. I used van Dyke brown & burnt sienna to simulate the oil stains on the underside. The rest of the small pieces were attached at this point. Take special care when attaching the landing gear to get the rake, splay right, and that the wheels have the proper camber. Next attach the gear doorsagain checking the alignment and clearance from the wheels, Eduard has made this a little easier by putting a flat spot on the door side of the gear leg. The tail wheel gives you a choice one with a true stirrup arrangement or one that is all one piece, I chose to use the 3 part unit, assembly was easy and once the paint was removed from part of the shaft it slide into place easily. The cooling exhaust for the underwing radiators can now be attached. There is a small actuator on the inside of the radiator that is visible. The door can be displayed in the open or closed position. The antenna mast was then attached, note there is no wire going to the tail as in earlier Mks.
The canopy masks fit well and aide in a quick and easy painting. They are painted British interior grey green on the inside and dark green on the outside, a small mirrored sequin was punched out to provide the reflective surface for the rear view mirror. The front and rear canopy were then attached to the model with white gator glue, the fit was excellent. Once these were set the sliding portion of the canopy was also attached in the open position slid all the way back so the small notch was up against the antennae mast. The swing down door on the cockpit was painted British interior green then washed with MIG dark wash and the pry bar painted red. It was then attached in the open position. The exhaust was painted with Alclad exhaust manifold then dry brushed with MIG rust powder and installed. The upper cowl was then attached locking the exhausts in place. MIG pastels were used to simulate the exhaust stains on the fuselage, then fixed with Dullcoate.